PREMIERE PRO CC 2018 PREVIEW: 5 MUST-KNOW NEW FEATURES
ADOBE PREVIEWS NEW SHARED PROJECTS, IMMERSIVE EFFECTS, AND RESPONSIVE DESIGN TOOLS IN PREMIERE PRO CC 2018.
The new features coming to Premiere Pro CC this Fall take new aim at collaborative editing and motion graphics workflows. In Premiere Pro CC 2018, video creators will find new ways of sharing projects, new ways of VR/360 video storytelling, and new ways to adapt motion graphics to fit project requirements.
5 MUST-KNOW NEW FEATURES IN PREMIERE PRO CC 2018
After exploring Premiere Pro CC 2018, here are the 5 new features we're most excited about:
- Multiple Open Projects
- Shared Projects
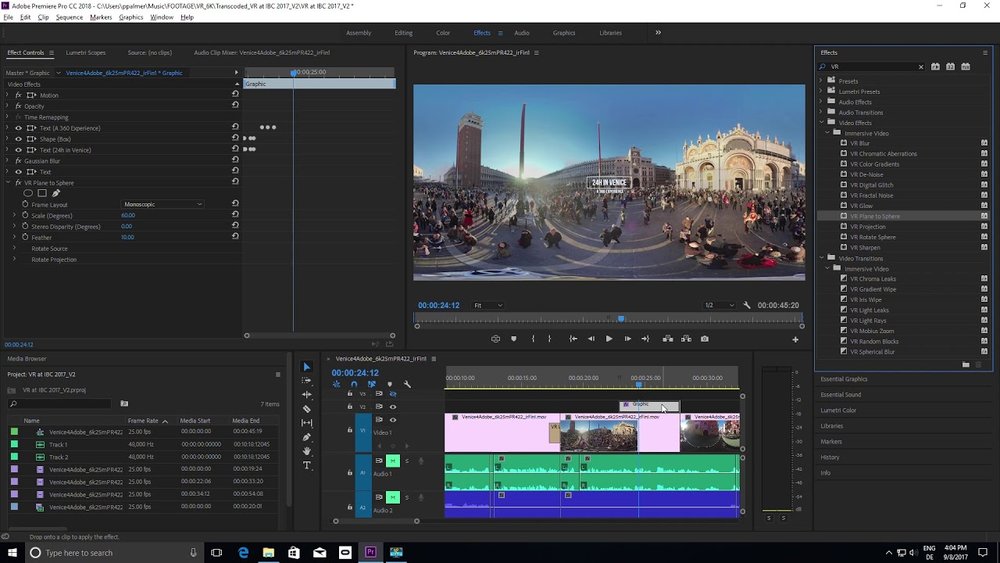
- Immersive Video Effects and Transitions
- Responsive Design tools (Timing and Position)
- 8 New Label Colors
In this review, we'll take a close look at all five of these features. But first, if you're looking for a 1-minute rundown of what's coming in Premiere Pro CC 2018, we recommend you watch the official Adobe preview of what's new in Premiere Pro CC 2018:
Deep collaboration features; immersive, end-to-end VR/360 workflows; Responsive Design time and position-based controls for working with motion graphics; and much more - coming soon to Adobe Premiere Pro CC.
1. MULTIPLE OPEN PROJECTS
This will take some Premiere Pro users straight back to Final Cut Pro 7. Premiere Pro has long been criticized for not supporting multiple open projects. The ability to browse and import assets from other Premiere Pro project files with the Media Browser was a practical albeit incomplete solution. Not so any longer!
CC 2018 will be the first version of Premiere Pro to allow users to browse, import, and most importantly, edit, between multiple open projects. Watch the official Adobe preview of Multiple Open Projects in Premiere Pro CC 2018:
Open, access, and work on multiple projects at the same time - coming soon to Adobe Premiere Pro CC.
Opening another project inside your active one is easy: select Open Project from the File menu or use the default keyboard shortcut Control/Command+O. You can also right-click Premiere Pro project files in the Media Browser and choose Open Project. You can have as many open projects as you want.
Closing a Project panel does not remove it from the active project. You can see what projects are open in the Window > Projects menu as shown below. This also comes in handy if you happen to loose track of a Project panel in your workspace. (It can happen!)

NOTE: Opening a project file from a previous version of Premiere Pro will require you to update it to CC 2018.
If you make changes to an open project, you will be prompted to save it when quitting the master project.
The benefit of having multiple open projects is you can drag assets between them seamlessly. It allows users to edit media from one open project directly into the sequence of another open project. It's obvious that this multi-project workflow will immensely accelerate cutting scenes and shows in a series where assets are frequently reused. On that note, hopefully you're already using template projects (saved projects with custom bin structures and commonly used assets) because they will certainly be practical now!
NOTE: Importing assets from one open project to another does not move the source media.
2. SHARED PROJECTS
The simplest way to describe the new Shared Projects in Premiere Pro CC 2018 is Team Projects for shared storage networks. Team Projects is for the cloud; Shared Projects is for shared storage. Watch the official Adobe preview to see an overview of Shared Projects in Premiere Pro CC 2018:
Work seamlessly with multiple editors or assistants on a single project simultaneously - coming soon to Adobe Premiere Pro CC.
Shared Projects begin in the new Collaboration menu under Preferences. Enable Project Locking and create a User Name for yourself or your edit bay.

The User Name will appear in the new Project Locked metadata category, which displays the current owner of the project file. The owner has write access to the project, to all other users the project will be read-only.

In the bottom left corner of the Premiere Pro CC 2018 interface is the Project Lock icon. When the lock is green/unlocked it means the file is writable, and you can save changes. Red/locked means the project is read-only - to you. However, if you're the owner of a Shared Project, when you lock the project (red) it means the project is available to other users on the network to take over.
Here's an easy way to remember what the Project Lock status means:
- Green = me
- Red = them

You can create Shared Projects inside active projects under the New Item icon. The new Shared Project will automatically be read-only to other users.

When you're finished making changes to your Shared Project, click the lock icon so that it turns red/locked. This will allow other users to take over the project.
NOTE: The Project Lock will remain in its current state until you change it, even when you close Premiere Pro.
3. IMMERSIVE VIDEO EFFECTS AND TRANSITIONS
Premiere Pro CC continues to lead the charge in VR/360 video with a new offering of Immersive Video Effects and Transitions. Watch the official preview below:
These new VR/360 video effects are the lovechild from Adobe's acquisition of Mettle's SkyBox Suite. Notice that all of the new Immersive Video Effects and Transitions are GPU accelerated. That's a big leap forward for native VR/360 video editing in ANY NLE. Period.

Editors not familiar with VR/360 video need to understand that standard video effects do not work with equirectangular video, mainly because it produces a seam where the edges of the frame come together. The new Immersive Video Effects and Transitions in Premiere Pro CC 2018 are purposefully designed for VR/360 video in that they are literally seamless when applied to equirectangular video. See the difference below, when a Gaussian Blur effect is applied to a 360 video clip, and when the new VR Blur effect is applied.

These new Immersive Video Effects and Transitions will empower new VR/360 video storytelling within Premiere Pro CC 2018. With the new Immersive Video Effects and Transitions, Premiere Pro CC 2018 will truly provide a native end-to-end VR/360 video editing workflow.
ADOBE IMMERSIVE ENVIRONMENT
The actual editing experience in Premiere Pro is about to get more immersive, that is if you have a VR head-mounted display, like the Oculus Rift or HTC Vive. In Premiere Pro CC 2018, editors will be able to navigate a new VR timeline in what will be called the "Adobe Immersive Environment." This feature will be accessible under the Playback preferences, and will only be available to PC users upon initial release. Editing with a VR controller in the Adobe Immersive Environment can be done in tandem with traditional (keyboard, mouse) editing tools.
4. RESPONSIVE DESIGN TOOLS
The Essential Graphics panel, Motion Graphics Templates, and titling tools all see improvements in Premiere Pro CC 2018. Watch the official Adobe preview below to see all the updates in action.
Updates to the Essential Graphics panel and Motion Graphics templates include responsive design, the ability to manipulate multiple graphics layers, and more - coming soon to Adobe Premiere Pro CC.
The big new feature is Responsive Design, which will come in two flavors:
- Responsive Design - Time
- Responsive Design - Position
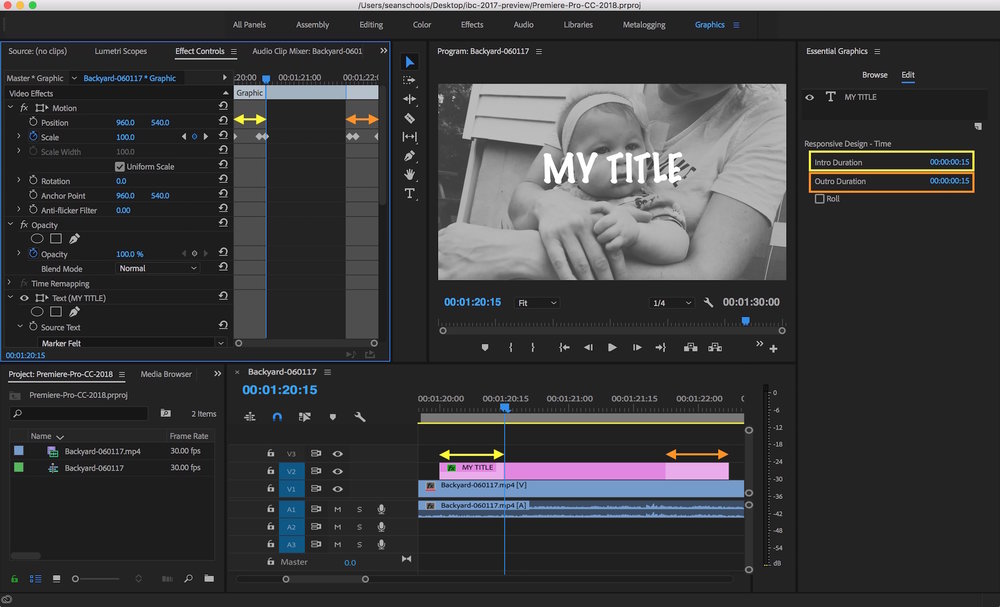
Responsive Design - Time can be found in the Essential Graphics panel where that awkward empty space under the Edit tab used to be. This area is now reserved for Responsive Design - Time and other clip-based settings, which apply to the whole graphic clip. One might expect to see more graphic clip-based controls to go here in future release.
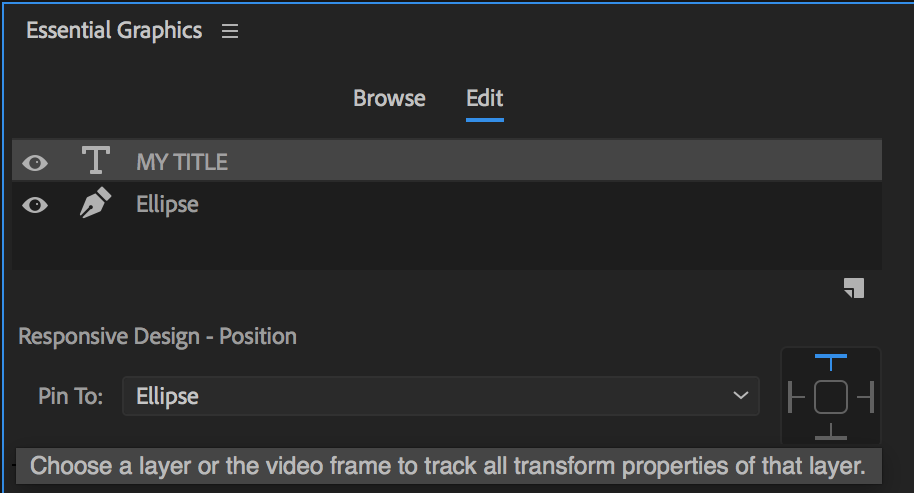
Responsive Design - Position, on the other hand, is layer-based and can be found alongside the other title tools in the Essential Graphics panel.
RESPONSIVE DESIGN - TIME
With Responsive Design - Time, keyframe animations will adapt when making ripple edits to graphic clips in the Timeline. This will allow editors to create complex title animations and Motion Graphics Templates that can be responsively retimed to fit any sequence in any open project.

The important thing to realize is you're defining the intro and outro by duration. This means you're selecting keyframes based on a range of time and not the keyframes themselves. Keyframes within the selected duration will be pinned to the beginning or end of the clip.

Once the Intro and Outro Durations have been set, you will see the range selected in the Effect Controls panel. You will also see the selected range highlighted on the clip in the Timeline. (See image below.) If the clip is shortened to less than the Intro and Outro Durations, the relative timing of the animation will still be preserved. When making ripple edits to the graphic clip, the intro and outro animation will be preserved.

RESPONSIVE DESIGN - POSITION
Using the new Responsive Design - Position controls, you can pin a layer to another layer or to the video frame itself. Pined layers will automatically adjust to changes made to other layers based on the positioning you've selected. This responsive positioning applies when typing new text or when adding Motion Graphics Templates to sequences with different aspect ratios.

ROLLING TITLES
The Essential Graphics panel in Premiere Pro CC 2018 will include a Roll setting for creating rolling titles and credits. Set the amount of pre and postroll, easing, and whether or not the animation will begin/end offscreen.

PREVIEW, FILTER, AND FAVORITE FONTS
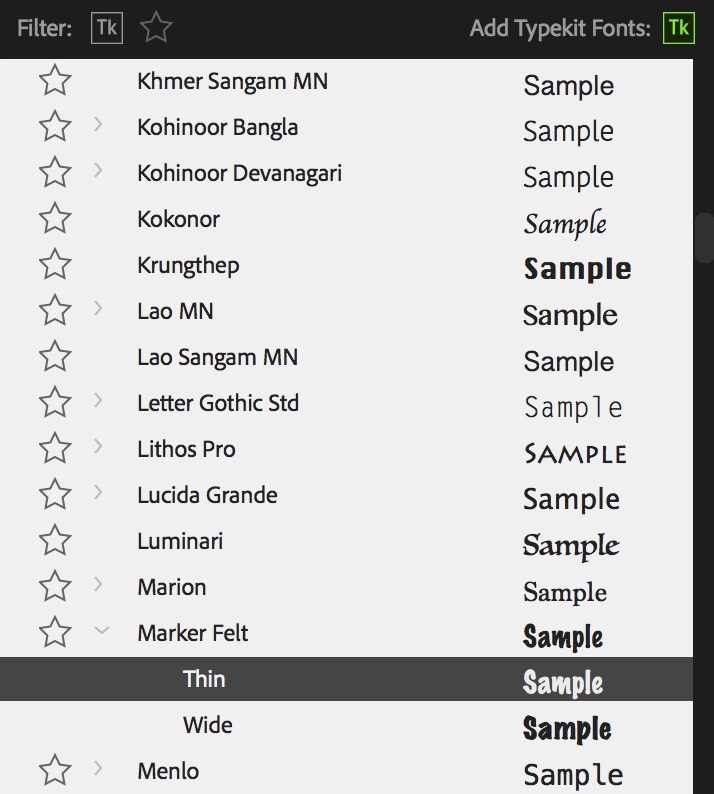
In Premiere Pro CC 2018, you will be able to preview fonts in the Essential Graphics panel like you could in the Legacy Title Designer. *Audible sigh of relief.* Even better, users will be able to save commonly used fonts as favorites by clicking on the stars to the left of the fonts. You will then be able to filter fonts to only show ones you've favorited. Typekit fonts will also have their own filter.

Lastly, editors will no longer need After Effects CC in order to use and edit Motion Graphics Templates made in After Effects. "Most" Motion Graphics Templates properties will be editable in Premiere Pro without having After Effects installed.
It's exciting to see the Essential Graphics panel toolset expanding, particularly with the addition of the Responsive Design features. We believe this will be a breakthrough in motion graphics workflows, and Premiere Pro CC 2018 is still only the beginning of the Essential Graphics era.
5. 8 NEW LABEL COLORS
Premiere Pro CC 2018 will add 8 new Label Colors for a grand total of 16. It's a small thing with BIG organizational benefits, and it will have many long-time Premiere Pro users jumping for joy!
Not to worry, all your favorite Label Color names, like Cerulean and Lavender, are still there. They remain assigned to the 8 Label Defaults like before. The 8 new Label Colors have no default assignments, and can be used in your own label coloring system. As before, you can customize the Label Colors by clicking on the color swatch.

Another cool thing about the new Label Colors is they will carry over to Audition CC as clip colors. After Effects, however, has its own label system.
With the addition of new features like Shared Projects and Multiple Open Projects, it's not a bad time to consider how Label Colors can be used as a communication tool in collaborative editing workflows.
BONUS: NEW CLOSE GAPS COMMAND
Premiere Pro CC 2018 will finally give users a native solution for closing gaps in the timeline. It’s called: Close Gaps. It’s a Sequence command so it will be found under Sequence > Close Gaps. Alternatively, you will be able to assign Close Gaps a custom keyboard shortcut.

Close Gaps will work with clip selection as well. So you can select the clips themselves or a specific gap to close.

READ THE OFFICIAL ADOBE PREMIERE PRO BLOG POST:
Premiere Pro CC 2018 will be available this Fall.


No comments:
Post a Comment